Piano fingering is one of the most crucial aspects of learning the instrument, yet it is among the most overlooked. Here are seven of the most important rules for fingering, prefaced by an instruction to…
Rule #0: Finger it out for yourself!
No two hands are alike. What’s perfectly comfortable for one person may be unplayable for the next.
It’s therefore essential to come up with your own piano fingerings rather than rely on the editor’s. (The exception is usually the composer’s own fingering, though these are generally rare and typically apply to the period instrument, such as fortepiano or harpsichord, more so than the modern piano.) This is why I recommend many unfingered sheet music editions.
That said, it’s important to play by the rules. Good piano fingering is based on the natural shape of the hand. Generally, what is most natural is most comfortable, and what is most comfortable sounds the best.
Ultimately, the goal of fingering should be to achieve the most beautiful and effective sound possible. Here are seven essential rules to help you achieve just that.
Rule #1: The natural hand position
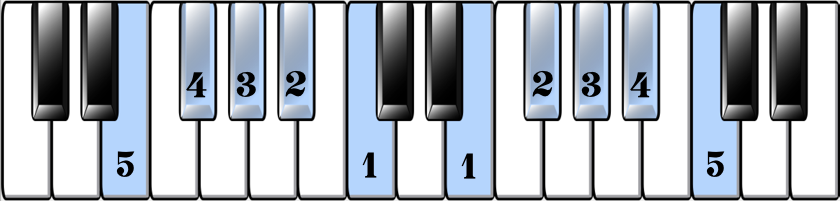
The first rule of piano fingering is that the shorter fingers play the longer keys, and the longer fingers play the shorter keys.
The shorter fingers are the thumb and pinky, fingers 1 and 5. The longer fingers are the index, middle and ring fingers, fingers 2, 3 and 4.
This piano fingering rule is exemplified by the natural hand position, in which fingers 2, 3 and 4 rest on F-sharp, G-sharp and A-sharp, while fingers 1 and 5 are on E and C.
Chopin always started his students with a slightly modified version of this hand position, using B in place of C. I prefer to use C for symmetry, though to small hands B might feel more natural.
This means that, in general, it’s most natural to use the middle fingers for the black keys. A corollary of this rule is that the thumb usually (but by no means always) avoids playing the black keys.
Rule #2: Scales
One of the reasons it’s so essential to know all of your piano scales is so you can play the piano with the most natural and effective fingering. When reading piano music our fingers need to know where to go.
Since so much of music is based on scales, knowing all of our scales without ever having to think about their proper fingering is an enormous head start.
In general, play any scalar passages with the same fingering that you use when playing those scales alone.
Rule #3: Arpeggios
As for scales, it’s essential to learn the standard fingerings for arpeggios, also referred to as broken chords. Chords in root position aren’t enough – we also need to know all chord inversions.
Rule #4: Symmetrical fingering
The hands are mirror images of one another. If they’re moving in opposite directions – as in arpeggios for instance – it’s far more natural to change hand position at the same time in both hands. It’s easier to remember passages in which the thumbs coincide, for instance.
This rule generally should not override the rule of scales: Scales in contrary motion need to retain their proper fingering.
Rule #5: Use a consistent fingering for repeated motives
If a motive or figuration is repeated in another key, it’s often best to keep a consistent fingering, even if it sometimes means breaking other rules. Particularly in fast passages, a sudden change from, say, 1–2 to 2–1 can disrupt the fingering pattern and lead to mistakes.
Maintaining consistent piano fingering for repeated motives sometimes means a less natural fingering, but it aids the memory.
Rule #6: Five fingers, five colors
Chopin taught that each finger had its own color. Changing our fingering for a given passage can subtly and sometimes dramatically affect the resulting sound.
Try this passage with the logical piano fingering 3 2 1 3 2 1:

Now try it with 4 3 2 4 3 2:

Do you hear and feel the difference?
Be creative with your fingering. While much of the time you should finger for ease and efficiency, sometimes an inefficient fingering will be more expressive.
Rule #7: Write down your fingerings
I’m amazed at how many pianists fail to write down their fingerings. Some even scoff at the practice, dismissing it as a beginner’s crutch.
Yet writing down your fingerings is one of the most helpful of memory aids. It ensures that we’re consistent in our fingering during our piano practice.
The first thing I do after sight reading a new piece of music is write in all fingerings. I’m not entirely pedantic – my goal is to be able to look at any measure and know immediately which finger plays which note. I therefore don’t always need to write in every last fingering, with the exception of very intricate music such as fugues.
Start Your NEW Piano Journey
Sign up below and each week for the next year, I'll send you a conservatory-quality 3- to 5-minute lesson sharing exclusive playing and practice techniques used by concert artists worldwide.
Each lesson has been carefully crafted to meet the needs of players ranging from beginners to the late intermediate level.
We will never sell your information, for any reason.
